
14 Mar How to install double roller shades with minimal effort
If you’re keen on giving your home a fresh vibe, this nifty window treatment can do wonders at an unbeatable pace. A quick trip to your local hardware store, or a browse online, and you’ll be set with the necessary tools to smarten up your living area. Just grab a drill, a measuring tape, and a bit of patience – we’re talking about a DIY masterclass that anyone can pull off. Trust us, even your cat will give you a nod of approval!
First off, picking the right fabric is a game changer. Opt for something that compliments your room’s colours! New Zealand’s light can be a bit intense, so going for sun-blocking options might be a clever idea. If you’re in a sun-soaked spot like Papakura, think about materials that keep the heat at bay while adding an elegant touch. Plus, don’t forget about those cheeky nosy neighbours – style your window coverings to keep your privacy intact!
Next, it’s all in the numbers. Measure your windows accurately to ensure a snug fit. Getting those dimensions right means you’ll spend less time fussing about adjustments later and more time enjoying your newly styled space. And let’s be real, a wonky finish is a buzzkill. No one needs that kind of stress on a Saturday afternoon!
Finally, find a mate to lend a hand. Whether it’s your flatmate or your best mate, a second pair of hands makes everything smoother – plus, it’s a perfect excuse to grab a cuppa afterwards to admire your handiwork. So roll up those sleeves and get to it! You’ll be basking in your lovely new atmosphere before you know it.
Easy Steps for Fitting Your Window Coverings in South Auckland
Kick off by grabbing those brackets and a drill, because this is way simpler than it looks! Once you’ve got your window size sorted, measure the width and height accurately. Cut any excess fabric if necessary, but don’t go all slice-happy–precision is key!
Position the brackets at the top of your window frame. Make sure they’re level; a wonky setup will have your coverings hanging like they’re on an adventure of their own. Use screws, and for the love of all things kiwi, don’t over-tighten–just enough to secure them.
Gently lift your coverings into the brackets. It’s like putting a hat on your kid–easy does it! You’ll often hear a satisfying click when they’re snug. Now, check if they operate well. If they’re jamming or sliding like a wonky rugby player, you might need to re-check the alignment.
Pull out those side channels, if your setup calls for them. Fix them along the sides for a clean finish, and voila! You’ve transformed your living space without breaking a sweat. Now sit back, enjoy a cup of Milo, and admire your handiwork. Who needs expensive professionals when you’ve got passion and a few simple tools?
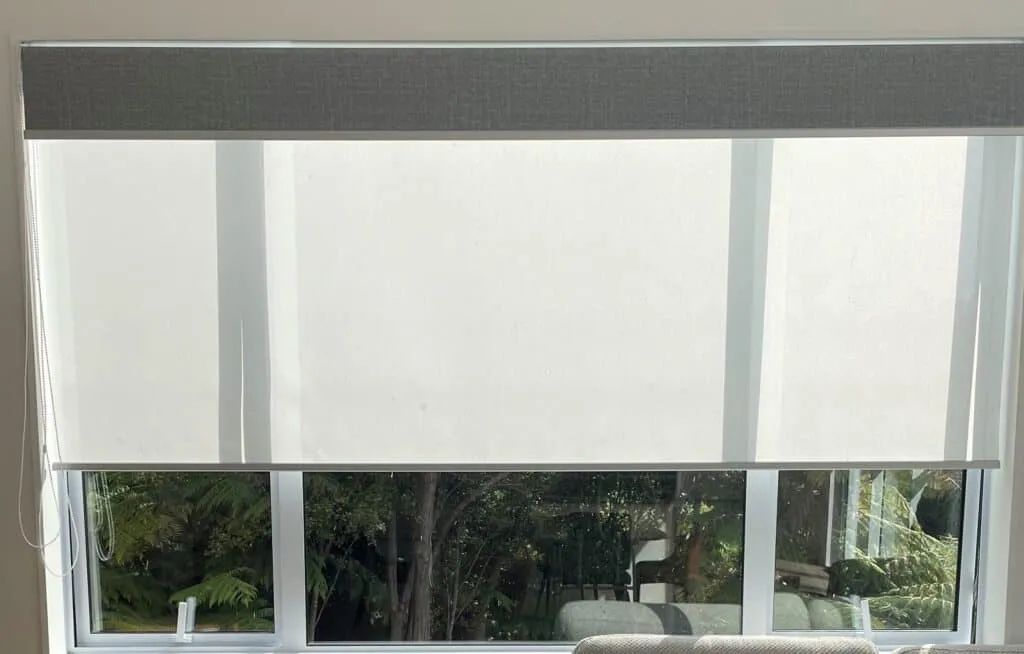
Selecting the Right Double Roller Shades for Your Space
Start by measuring your windows. Take accurate dimensions to ensure a snug fit. Don’t forget to account for any obstructions like handles or blinds, as they can affect how the shades operate!
Next up, think about the fabric! Light-filtering options let in sunlight while providing some privacy, while blackout fabrics are perfect for bedrooms or home theatres, keeping the space dark and cozy. Consider your room’s purpose; a sunny living room might benefit from a lighter material, whereas a snug movie zone requires something darker.
- Style matters: Opt for a neutral colour if you’ve got bold decor. If your room’s a bit bare, a splash of colour or a striking pattern can really bring things to life!
- Quality is key: Look for durable materials that can withstand the Kiwi sun. Check for UV protection and fade resistance to keep your shades looking sharp for years.
- Ease of operation: Choose between manual or motorised options. If you’re feeling fancy (or just lazy!), the motorised ones are a real treat.
Think about the installation process. Some styles come ready-made while others might need a bit of tinkering to get them just right. Don’t hesitate to consult a local expert if you’re unsure–it’s all about finding the right fit for your space and lifestyle!
Preparing the Installation Area for Double Roller Shades
Make sure you grab a good measuring tape and check the width and height of your window. You want those things to fit snugly, not hanging off the sides like a kiwi on a tightrope! After that, clear the area around the window. Move any furniture, plants, or any other sneaky objects that could end up being a tripping hazard. You don’t want to be the person who trips over their couch while trying to measure, right?
Grab a cleaning cloth and give the window frame a good wipe down. Dust and grime can make it hard for the installation brackets to stick properly. Can you imagine the brackets being all wiggly? Not ideal!
Make sure you’ve got good light in the space. Natural daylight is best, but if not, any bright light will do. Trying to fit shades in the dark is like looking for a lost sheep in a fog; you’re just asking for trouble!
Lastly, give yourself enough space to work. You want to feel like a pro, not a contortionist trying to fit into a tiny corner. Ensure there’s a clear pathway to the window and a strong chair or step ladder nearby if you need a boost. Safety first, folks!
Step-by-Step Process for Installing Double Roller Shades
Grab a tape measure and check the window width–measure it three times, just to be sure! Now, head over to your local supplier, like Sunguard, to pick up the right sizes. Those nifty blinds come in various options, and it’s all about finding what suits your style.
Once you’ve got your shades, lay everything out neatly. You’ll need a drill, screws, and possibly a level–don’t let your shades hang crooked! Mark the spot where you’ll fix the brackets, ideally 10cm from each end of the window frame. A little tip: if you’ve got a thick window frame, it might help to adjust the brackets accordingly so the blind fits snugly.
Drill into those marked spots and get your brackets secured. Easy peasy! Afterward, pop the headrail of the blinds into the brackets. Don’t forget to lock them in place. This is where a level comes handy; you don’t want to be adjusting it later on. It’s the kind of thing that can make you feel a bit like a DIY legend when it’s all straight!
Now, for the fun part–hanging the actual blinds. Take the fabric, align it, and attach it to the headrail. If things seem a bit tough, a glance at Sunguard for extra help might be useful. Give it a gentle tug to ensure it’s secure and check again for levelness–now’s the time to adjust!
Once everything’s in place, it’s the moment of truth. Pull that cord or chain–whoosh! Look at those beauties go, it’s like magic! And remember, if you’re still uncertain, check out guidelines from MBIE. They’ve got solid info on household projects.
All done? Time to sit back and enjoy your transformed space! Cheers to awesome blinds enhancing your home vibes, or as we say, ‘Sweet As!’
Maintaining and Adjusting Window Coverings for Long-term Use
Regular cleaning is key! Dust and grime can build up over time, affecting the look and functionality. A soft, dry cloth or a gentle vacuum cleaner attachment should do the trick. Aim to do this every month or so, especially if you’re in a coastal area where salty air might make things grimy quicker.
While you’re giving ‘em a clean, check for any signs of wear. Cords, brackets, or mechanisms can sometimes give out, and it’s better to spot issues early. If something doesn’t look right, it’s worth addressing it sooner rather than later. Parts can be replaced easily, so don’t forget to check out local suppliers or sites like https://www.building.govt.nz for guidance and parts.
For adjustments, the beauty of these coverings lies in their versatility. If you’re finding that the light control isn’t quite right, no problem! Most systems come with an easy way to adjust the tension or height. Follow the manufacturer’s instructions or check resources at https://www.lincoln.ac.nz for handy tips.
Weather in New Zealand can get a bit wild, so if you notice any fading due to UV rays, consider UV-resistant options or even simple clip-on UV filters to protect your interior. Likewise, ensure they’re fully closed during those blazing summer days to keep the chill in and the heat out.
Embrace a bit of Kiwi ingenuity! If you’re ever in doubt about the right settings or adjustments, reach out to local home improvement groups online. You’ll find plenty of Kiwis eager to share their insights, tips, and tricks on keeping your window coverings in tip-top shape!
Charlotte Miller
Posted at 02:38h, 06 MarchWhy bother with minimal effort? Just throw ’em up and hope for the best – classic Kiwi style!
Ava
Posted at 02:38h, 06 MarchHey team, have any of you managed to slap up double roller shades without losing your marbles? I’m over here staring at the mounting brackets like they’ve just landed from outer space. Are you all using some secret gadget, or is it just a matter of brute force and a good cup of flat white? I’ve got my tape measure and screws ready, but I’m slightly terrified of making a mess. What’s your go-to tip for getting those bad boys level? Do you reckon a level spirit is a must, or can I wing it with my keen eye? Have you had any mishaps that turned into epic tales? And what about those tricky window sizes in South Auckland—did you have to do any DIY wizardry to make them fit, or did the standard sizes work a charm? Let’s swap our hacks and horror stories, so I don’t stuff it all up! Cheers!
IronWolf
Posted at 02:38h, 06 MarchCheers for sharing such a handy guide on installing double roller shades – just what I needed! It’s mint to see straightforward steps laid out for us DIYers in South Auckland. I love how you broke it down into bite-sized pieces without any fluff. It really feels doable now. Can’t wait to give it a crack and enhance my space with those shades. Just the touch I’ve been after! Keep up the wicked work!